In the latest release, we’ve streamlined cAdmin’s Campaign Portal Configurations to enhance user-friendliness. Key features include customizing Campaign Portal navigation labels, meeting details, directions, links, images, and the visibility of activities tailored to specific user personas, allowing for quicker and more efficient administration aligned with your campaign needs.
How to Configure Portal Campaigns and Tasks
1. In cAdmin, go to Configuration > Site Configuration, then click Campaigns. Only users with the roles of Association Administrator, Distributor Administrator, Association Team Leader, or Distributor Team Leader have access to the Configuration tab.
2. Scroll to DashBlockTemplate_Messages or DashBlockTemplate_Tasks and verify that at least one activity type is assigned. If these configurations are missing, click Add New Configuration, copy and paste one of the configurations mentioned above, and save it. This ensures that the Messages (Campaigns) or Tasks tabs are visible on the Portal for users with the assigned activity type.
• Note: Qualifier 1 represents the Campaign’s “Internal name,” which is hidden by default on the Campaigns dashboard. To display it, click the gear icon and enable “Internal name.” Do not add extra qualifiers for Messages or Tasks, as Qualifier 1 alone is sufficient.

3. Navigate to Settings > Workflow Applications > cPortal, and choose either the Tasks or Messages (Campaigns) tab to modify. Here, you can update the tab’s Navigation label, Instructions text (with links and images), and Sidebar content.
4. To update the fields displayed on the Portal card, return to Configuration > Site Configuration > Campaigns and navigate back to DashBlockTemplate_Messages or DashBlockTemplate_Tasks, and select one of the assigned activity types.
• Note: As mentioned, no additional qualifiers other than Qualifier 1 are necessary for Messages or Tasks.
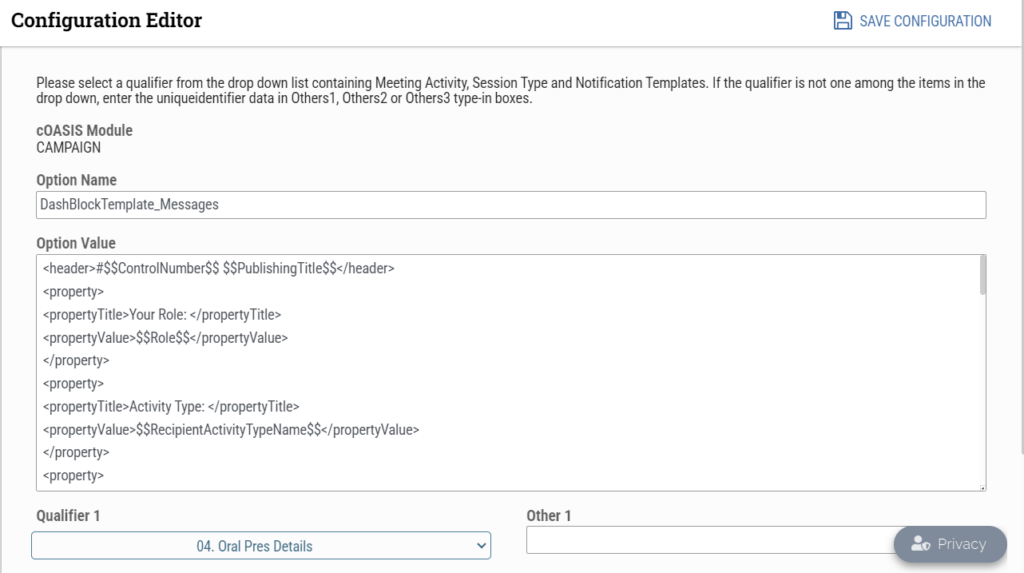
5. Add the fields in the order in which you’d like them to appear on the portal. Use the following formatting in the Option Value field to display the desired information:
Example Fields with Formatting:
The dollar signs ($$) represent cAdmin fields pulled into the Portal, and the text between <propertyTitle> tags are custom labels that will appear on the Portal.
Header Example:<header>#$$SessionNumber$$ - $$SessionTitle$$</header>
Field Example:<property><propertyTitle>Session Date: </propertyTitle><propertyValue>$$SessionDate$$</propertyValue></property>
Full Example:
<header>#$$ControlNumber$$ $$PublishingTitle$$</header>
<property>
<propertyTitle>Your Role: </propertyTitle>
<propertyValue>$$Role$$</propertyValue>
</property>
<property>
<propertyTitle>Activity Type: </propertyTitle>
<propertyValue>$$RecipientActivityTypeName$$</propertyValue>
</property>
<property>
<propertyTitle>Session: </propertyTitle>
<propertyValue>$$SessionNumber$$ - $$SessionTitle$$</propertyValue>
</property>
<property>
<propertyTitle>Session Date: </propertyTitle>
<propertyValue>$$SessionDate$$</propertyValue>
</property>
<property>
<propertyTitle>Session Time: </propertyTitle>
<propertyValue>$$SessionStart$$ - $$SessionEnd$$</propertyValue>
</property>
<property>
<propertyTitle>Session Location: </propertyTitle>
<propertyValue>$$SessionLocation$$</propertyValue>
</property>
<property>
<propertyTitle>Presentation Time: </propertyTitle>
<propertyValue>$$SessionRoleStart$$ - $$SessionRoleEnd$$</propertyValue>
</property>
<property>
<propertyTitle>Presentation Number: </propertyTitle>
<propertyValue>$$PresentationNumber$$</propertyValue>
</property>
<property>
<propertyTitle>Poster Board Number: </propertyTitle>
<propertyValue>$$PosterboardNumber$$</propertyValue>
</property>
<property>
<propertyTitle>Program Status: </propertyTitle>
<propertyValue>$$ProgramStatus$$</propertyValue>
</property>
<property>
<propertyTitle>Session Role Status: </propertyTitle>
<propertyValue>$$SessionRoleStatus$$</propertyValue>
</property>
<property>
<propertyTitle>Campaign Response Status: </propertyTitle>
<propertyValue>$$CompleteStatus$$</propertyValue>
</property>
<property>
<propertyTitle>Campaign Response Value: </propertyTitle>
<propertyValue>$$ResponseAction$$</propertyValue>
</property>
<property><propertyTitle>Author Block: </propertyTitle><propertyValue>$$PresentationBlock$$</propertyValue></property>
<property><propertyTitle>Disclosure Block: </propertyTitle><propertyValue>$$DisclosureBlock$$</propertyValue></property>
<property><propertyTitle>Primary Author Name: </propertyTitle><propertyValue>$$PresentingAuthor$$</propertyValue></property>
<property><propertyTitle>Role Duration: </propertyTitle><propertyValue>$$PresentationDuration$$</propertyValue>  mins</property>
<property><propertyTitle>Submission Topic: </propertyTitle><propertyValue>$$ControlTopic$$</propertyValue></property>
<property><propertyTitle>Abstract Body: </propertyTitle><propertyValue>$$AbstractBody$$</propertyValue></property>
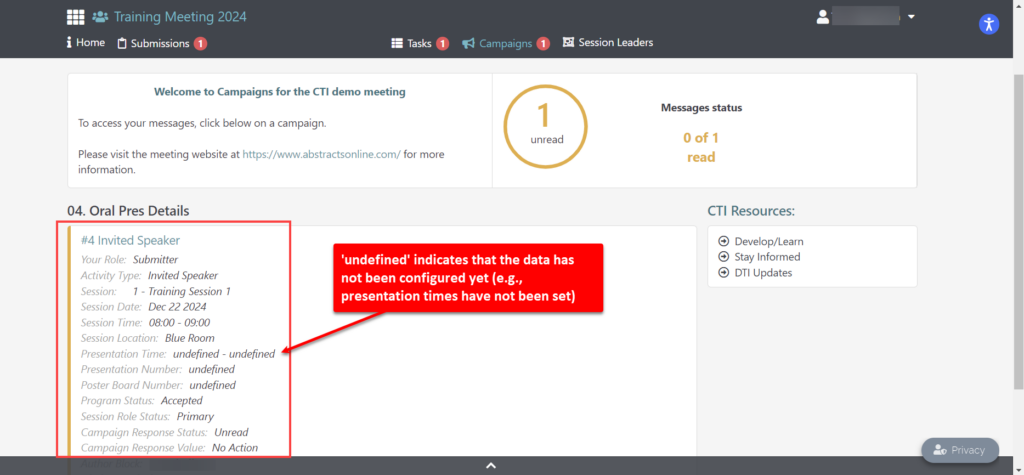
6. Test the configuration by selecting the Campaigns tab within cAdmin, choosing the configured campaign, and entering a test control number. Preview the changes in the Messages or Tasks tabs within the Portal by shadowing a test user. Refresh the Portal page after each cAdmin config update and adjust the fields to achieve the desired layout.