You’ll see a BETA label next to the new Import feature—this indicates it’s version 1 of a tool we plan to expand and refine over time. cAdmin’s Import feature lets you pull in lists, session types, activities, campaigns and more from any past meeting—no rebuilding from scratch.
BETA Notice
You’ll see a BETA label next to the new Import feature—this indicates it’s version 1 of a tool we plan to expand and refine over time. It’s functional and ready to use, though you may notice a few rough edges as we gather feedback and shape future enhancements.
Overview
cAdmin’s Import feature lets you pull in lists, session types, activities, campaigns and more from any past meeting—no rebuilding from scratch. By reusing proven configurations, you slash setup time and costs, reduce manual data-entry errors and enjoy the flexibility to mix and match only the components you need for each meeting.
Who Can Use It
All cAdmin roles have access to Import, except for Freelance Onsite AV Staff & Vendors.
Where to Find Import
• Homepage: Click Import in the upper-right corner. • Individual Dashboards (Lists, Activities, Campaigns, etc.): Click Import on that dashboard to copy only those settings.
What You Can Import
1. Lists 2. Custom Terms 3. Session Types 4. Activities 5. Campaigns 6. Extra Data Fields 7. Media Types 8. Collection Templates
Full Import Wizard (All‑in‑One)
1. Initiate Import • From the homepage, click Import (upper right).
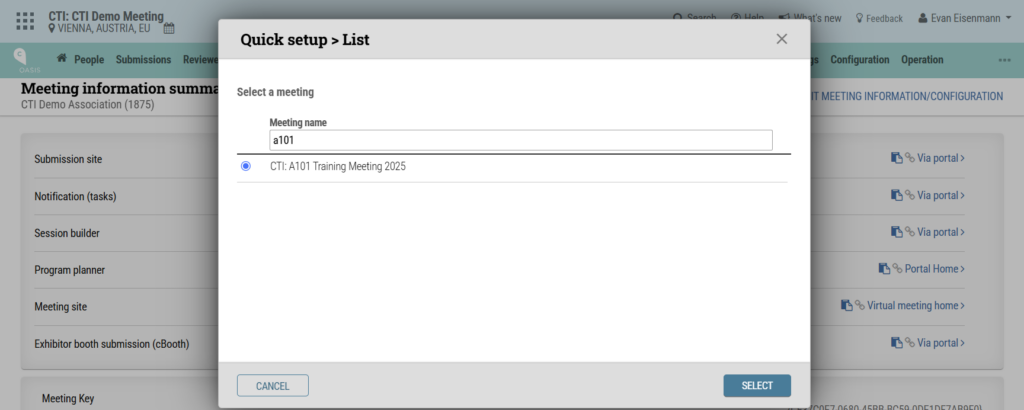
2. Select Source Meeting • Choose the meeting whose settings you want to copy. • Use the search bar to filter by meeting name or date.
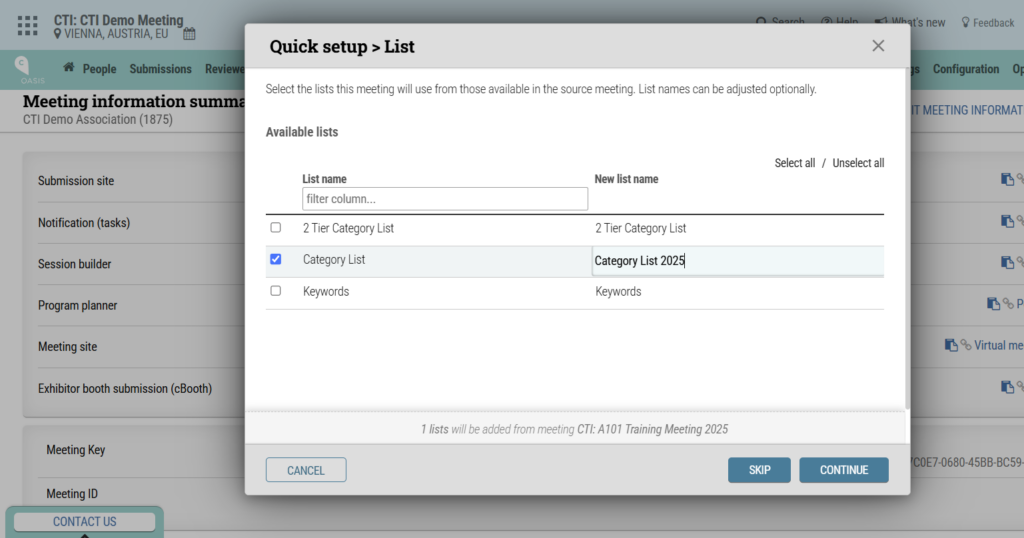
3. Step Through Each Setting Lists • Skip if you don’t need them. • Select any list to copy. When you do, its row may highlight yellow—this indicates that a list with the same name already exists in the new meeting. You must rename it in the New list name field (e.g., “Category List” → “Category List 2025”), otherwise the import won’t allow duplicate names.
Custom Terms • Check the terms to import and adjust each “Meeting level value” as needed. • The running footer at the bottom of the dialog box reminds you which meeting you’re copying from.
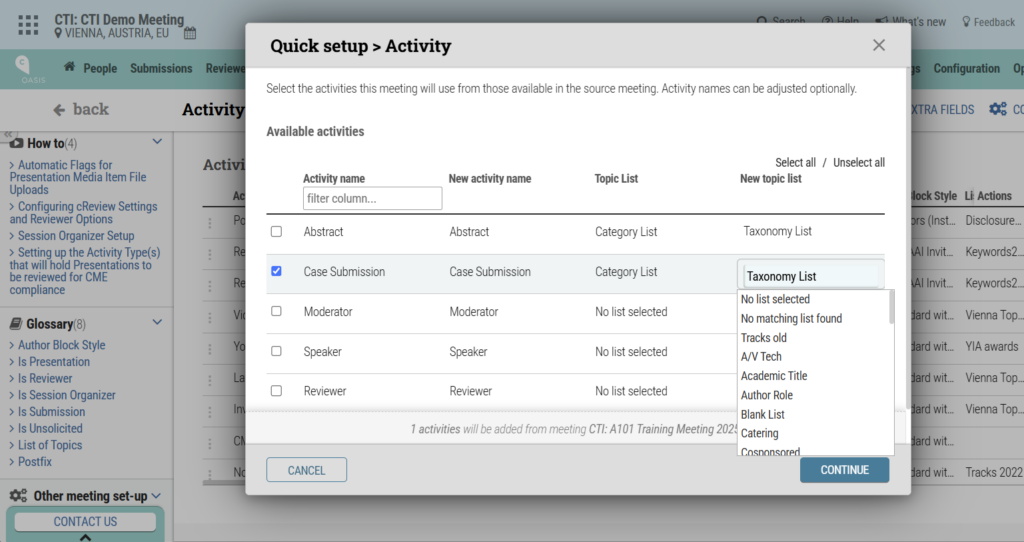
Session Types, Activities, Campaigns, etc. • Follow the same pattern: skip or select, then rename or update as desired. Any selection that conflicts with an existing name will highlight yellow, signaling you to provide a new name before proceeding.
4. Review & Confirm Click Continue at each step to confirm or skip the import.
5. Verify After completing the wizard, visit each dashboard to ensure your imported settings appear correctly.
Quick-Pick Imports
If you only need one setting (e.g., an activity): 1. Navigate to the relevant dashboard (e.g., Activities) and click Import. 2. Select your source meeting and the specific item(s) you want to bring in. The selected row will highlight yellow if its name already exists—rename it to avoid conflicts. For activities, you can also choose a New topic list. 3. Click Continue to confirm the import.
Benefits
• Time & Cost Savings: Reuse proven configurations rather than rebuilding from scratch. • Error Reduction: Minimize manual data-entry mistakes. • Flexibility: Mix and match only the components you need for each meeting.
With the latest update, clients can now configure cReview settings, streamlining the management of peer review workflows. The cReview process supports everything from simple accept/reject decisions to complex scoring and recommendations. This update introduces a dedicated cReview Settings area, allowing users to define base, advanced, and activity-specific configurations directly within cAdmin.
With the latest update, clients can now configure cReview settings, streamlining the management of peer review workflows. The cReview process supports everything from simple accept/reject decisions to complex scoring and recommendations. This update introduces a dedicated cReview Settings area, allowing users to define base, advanced, and activity-specific configurations directly within cAdmin.
cReview Settings
The cReview process is divided into general settings in the cReview settings area, and activity-specific settings under the Activity details in the cReview tab.
Accessing cReview Settings Navigate to Settings -> Workflow applications -> cReview. The “Base configurations” tab contains all the basic configurations needed to get the cReview site up and running.
Accessing the cReview Page To access the cReview page in the Portal, click on the Review tab and select a control.
Base Configurations
To simplify the setup process for cReview, we’ve consolidated all the fundamental configurations needed for a basic cReview site, called “Base configurations.”
• Activity type(s) with access to module: Defines which activity types can access the module. • Activity type(s) with access to edit the score on the editable score report page: Defines which activity types can edit scores. • Custom module header: Input the header image URL from the Settings -> Meeting set-up -> Files. • Welcome header instructions: Content under the module header • Main content displayed on the instructions page, which serves as the default homepage for this module: Content under the Welcome header instructions. Leave blank if not needed. • cReview header for print: Customizable header for printed materials. • Content of the instructions page: Main content displayed on the instructions page.
• Custom module footer: Customizable footer for the module. • cReview footer for print: Customizable footer for printed materials. • Custom CSS: Allows customization of the module’s CSS. • Hide histogram on left-side menu: Turn ON to hide histogram on the left-side menu. • Top instructions for edit/view scores page: Instructions displayed at the top of the edit/view scores page. • Bottom instructions for edit/view scores page: Instructions displayed at the bottom of the edit/view scores page.
• Allow filtering by activity from left-side menu: Option to enable filtering by activity (ON). • Allow filtering by category from left-side menu: Option to enable filtering by category (ON) shown below. • Allow filtering by presentation preference from left-side menu: Option to enable filtering by presentation preference (OFF) shown below.
• Label for review flag 1: Customizable label (Newsworthy) • Label for review flag 2: Customizable label (Controversial) • Label for review flag 3(4-10): Customizable label (Requires Additional Consideration) • Selectable comments label: Customizable label (Additional Comments) • Selectable comments (list): Choose a list from the meeting dropdown to display. • Other reviewer comments label: Customizable label (Reject Reason). Reviewers can enter additional comments to their scores.
The “Base configurations” for cReview simplify setup by consolidating essential settings, including access permissions, customizable headers and footers, content instructions, filtering options, and review labels. Some settings appear in other tabs but update automatically when changed.
Following the “Base configurations” section is “Site settings,” which includes optional or advanced settings that often overlap with the base configurations. New fields in this section are: • Removing print and email links: Turn ON to remove “Print the Summary of Score Sheet” and “Email Your Review Summary” buttons from the Instructions page. • Top instruction for the feedback page. • Left side-menu options: Toggle options as labeled.
To find the rest of the cReview Settings tabs, simply copy and paste any terms you have questions about into the Knowledge Base search bar or refer to the article titled: “cReview Settings (Reviewing, Multicriteria scoring, Summary email, Reporting, Advanced).”
cReview Activity-Specific Settings
Navigation: 1. Go to cAdmin Submissions->Activities. 2. Choose the review activity to edit. 3. Click the cReview tab.
Reviewing Options:
• Type-in Score Instead of Dropdown (ON/OFF): If ON, replaces the score dropdown with a text entry field, typically used with multi-criteria scoring. • Implement Custom Questionnaire: Embeds a custom questionnaire linked to a specific “control” (meeting-identifier) in the cOASIS cReview site. • Unassign from Assignee in Session Builder Too (ON/OFF): If ON, unassigning a reviewer from an abstract also removes them from the corresponding session assignments in the Session Builder module. • Show Disclosure Block in Review Abstract (ON/OFF): Rarely used. Activities • Prohibited from Scoring Abstracts (ON/OFF): If ON, disables scoring options for selected submission activity types (default = scoring enabled). • Show Reviewer Uploads in Quick Score Page (ON/OFF): If ON, reviewer-uploaded files are visible on the quick score page; if no file is uploaded, the field remains hidden.
Instruction Fields: • Bottom instructions in the abstract review pages (single or in bulk) • Top instruction for (single) abstract review page • Top instruction for bulk view page • Bottom instructions for the bulk view pagination page • Top instructions for the bulk view pagination page
• Calculate Weighted Average Score When Saving (ON/OFF): If ON, enables weighted average score calculations when saving (default = no calculations). • Hide Data Labels if Data Fields Are Empty (ON/OFF): If ON, hides labels for empty data fields on the review page (default = empty fields still display labels). • Flags Display as Radio Buttons Instead of Checkboxes: Converts Flag1 – Flag10 selections from checkboxes to radio buttons (default = checkboxes).
Multicriteria
• Score validation method (any/exact/range): Determines how individual multicriteria scores are validated. ANY allows scores to exceed the max overall score for a submission, EXACT enforces min/max limits per criterion, and RANGE requires scores to follow the overall min/max allowed for a submission. • Multicriteria – Partial Score Description 1-10: Displays custom Text/HTML before each score row (1-10) in newer multicriteria scoring versions. If not set, the specific grading criteria do not appear.
Reviewer Uploads Settings
• Allow Reviewer File Upload (ON/OFF): If ON, allows abstract graders to upload files per submission activity type, displaying a file upload input for each abstract review entry. If OFF, the upload option is not available. • Label for Choose File Button: Defines the text or HTML label for the file upload button. • Include Uploaded File Name in Abstract Preview Print (ON/OFF): If ON, displays uploaded file names in the abstract print preview, but only if Allow Reviewer File Upload is also ON.
Advanced Settings
• Enable Multicriteria Scoring (XML Required): Enables the older version of multicriteria scoring, which does not support reporting on individual criteria scores. The newer version supports individual criteria reporting and does not require this setting. • Configure Input Fields for File Uploads (XML Required): Requires advanced XML configuration—consult a configuration analyst.
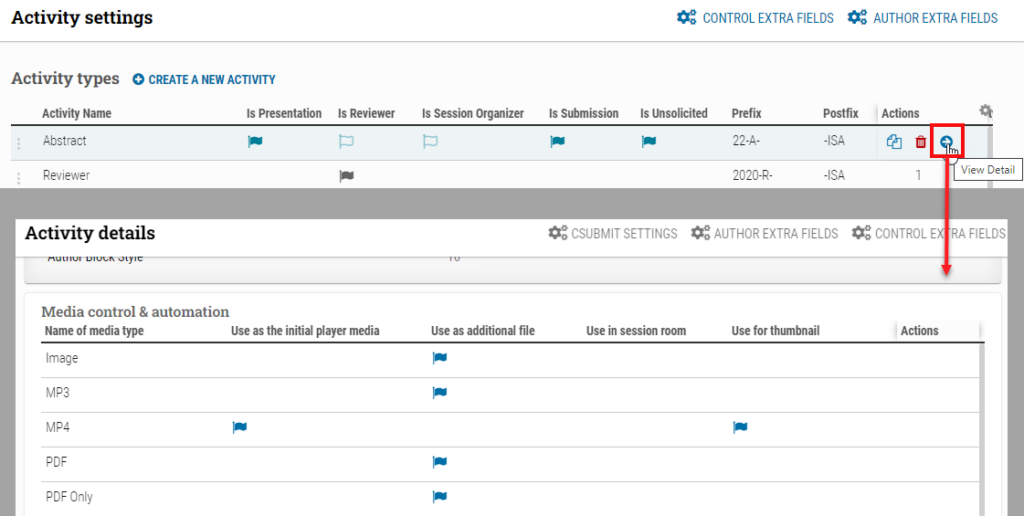
Administrators can use the Activity details flags under Media control & automation to indicate how, by default, newly uploaded presentation media item flags will trickle down to each assigned presentation.
Administrators can use the Activity details flags under Media control & automation to indicate how, by default, newly uploaded presentation media item flags will trickle down to each assigned presentation.
Please note only newly uploaded presentations will receive the updated flag after it has been set in Activity details, meaning this needs to be done prior to uploads starting. For example, if I want PDF files to be flagged as “Use in session room,” only after I check the flag below will the newly uploaded PDFs have the flag automatically set.
The media items an administrator creates in Settings > Media Components > Media items will appear as the rows in the card’s table.
Check the flags to set the following: – Name of media type: Name as entered in the Media Items settings page. – Use as the initial media player: This is the primary video for the Activity’s presentation. If multiple media items are flagged, the last media item uploaded will be the primary video. – Use as additional file: A flag in this column indicates that the file is supplementary (e.g., PDF handout or white paper, URL, video, etc.) – Use in session room: Select to indicate that the file should be synchronized to the on-site presentation management system and used on the speaker podium in the session room. – Use for thumbnail: Select to indicate that this media item will be the first file that appears in the player screen for the session or presentation. If multiple flags are selected, the last media item uploaded will be the default thumbnail. This thumbnail can be overridden at the Session type details, Session details, and Presentation details levels. In most cases, the thumbnail will be the same item as the initial player media. – Actions: Click ‘Select all’ to choose all the flags or ‘Deselect all’ to remove all the flags.
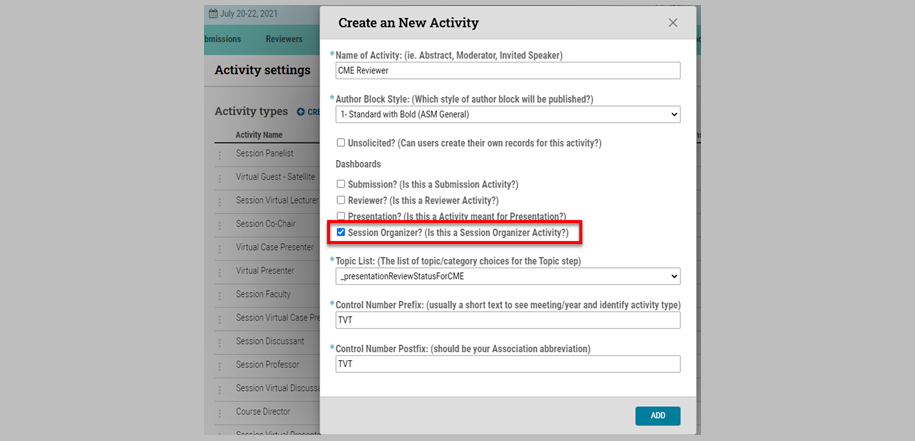
1. Create a new activity under Settings -> Meeting set-up -> Collection activities & roles 2. Click “Create a New Activity” 3. Name the activity, choose an Author Block Style, and check “Session Organizer.” Fill out the rest of the activity information 4. Click “ADD”
Administrators can view and edit a presentation to roles other than the presenter. Like a presenter, permitted roles can access the presentation through the Portal to check for quality control. Another level of edit permission enables them to make changes to the presentation as well.
Administrators can view and edit a presentation to roles other than the presenter. Like a presenter, permitted roles can access the presentation through the Portal to check for quality control. Another level of edit permission enables them to make changes to the presentation as well. This functionality has been commonly requested by on-site presentation management customers and is beginning to be requested by customers organizing hybrid and virtual meetings as a tactic to reduce the cost of external A/V labor.
To assign an activity as a Session Organizer: 1. Hover over the activity type under Submissions -> Activities. 2. Click the Edit icon. 3. Check the Is Session Organizer box.
Additional Information for Submissions: For submissions to show up on the Submissions tab, “Is Reviewer” and “Is Session Organizer” need to be unchecked.
The text with author names, often formatted with fonts, spaces, and style as required by the society’s publications. Each Author Block Style is assigned a number